You can manage the Windows core server more easily by installing the Core Configurator.
You can download it from here to the server. Extract it to the server drive. To open it; use the command prompt power shell and enter the following
PS C:\Users\Administrator\CoreConfig> .\CoreConfig.ps1
Where the CoreConfig is the location of the extrated file downloaded from CoreConfigurator.
Showing posts with label Windows Server 2003/2008. Show all posts
Showing posts with label Windows Server 2003/2008. Show all posts
Monday, 16 June 2014
Friday, 6 June 2014
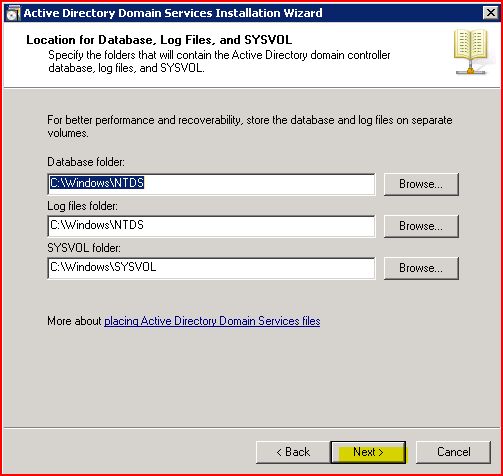
Installing Active Directory Domain Controller service on Windows Server Core 2008 R2
If you need to install AD DC on the core server where there is no GUI, you will have to create a unattend file and run the dcpromo.exe /unattend:unattend.txt
Create an unattend.txt file with the following
[DCInstall]
ReplicaOrNewDomain = Domain
NewDomain=Forest
NewDomainDNSName = dctest.local
AutoConfigDNS=Yes
RebootOnSuccess = NoAndNoPromptEither
SafeModeAdminPassword = PasswordComplex
Note: please install a static ip address on the server before proceeding to the AD DC.
Thursday, 5 June 2014
Installing Powershell on Windows Server 2008 core R2
To enable the powershell on Windows Server 2008 R2 core:


Setting up a static IP address on your Windows 2008 R2 core server
- Open the command prompt, type netsh interface ipv4 show interfaces to get the Idx value
- Then at the command prompt, type:netsh interface ipv4 set address name="<ID>" source=static address=<StaticIP> mask=<SubnetMask> gateway=<DefaultGateway>
- To setup DNS use the command: netsh interface ipv4 add dnsserver name="<ID>" address=<DNSIP>index=1

http://technet.microsoft.com/en-us/library/ee441257(v=ws.10).aspx
Friday, 21 March 2014
Restore Deleted Objects in Active Directory Database Using Tombstone Reanimation (LDP.EXE)
What
Is a Tombstone
When Active Directory deletes an object from the directory, it does not physically remove the object from the database. Instead, Active Directory marks the object as deleted by setting the object’s isDeleted attribute to TRUE, stripping most of the attributes from the object, renaming the object, and then moving the object to a special container in the object’s naming context (NC) named CN=Deleted Objects. The object, now called a tombstone, is invisible to normal directory operations.
From the Windows Server 2003 Installation CD, it is located on \SUPPORT\TOOLS\SUPTOOLS.MSIWhen Active Directory deletes an object from the directory, it does not physically remove the object from the database. Instead, Active Directory marks the object as deleted by setting the object’s isDeleted attribute to TRUE, stripping most of the attributes from the object, renaming the object, and then moving the object to a special container in the object’s naming context (NC) named CN=Deleted Objects. The object, now called a tombstone, is invisible to normal directory operations.
You do not need to follow this step, if using Windows Server 2008.
Process to Restore the Deleted Object
Run LDP.exe.
On LDP window, click Connection menu, click Connect, type the appropriate server name and port.
Click Connection menu, click Bind, and type the Administrator account and password.
Run LDP.exe.
On LDP window, click Connection menu, click Connect, type the appropriate server name and port.
Click Connection menu, click Bind, and type the Administrator account and password.
Click Options menu, click Controls.
On Load Predefined, select Return deleted objects.
This option will show the Deleted Objects container that is hidden by default.
On Load Predefined, select Return deleted objects.
This option will show the Deleted Objects container that is hidden by default.
Click View menu, click Tree, and then select the distinguished name of the domain name.
On the left, select DC=Microship,DC=com.
Then expand the Deleted Objects container, and find the deleted object.
On the left, select DC=Microship,DC=com.
Then expand the Deleted Objects container, and find the deleted object.
Right click on the nameoftheuser account, then click Modify.
In the Attribute box, type isDeleted. Under Operation, click Delete, and then click Enter.
In the Attribute box, type distinguishedName, in the Values box, type CN=name of the user ,OU=OUName,DC=DCName,DC=com. Under operation, click Replace, and then click Enter.
Select the Extended check box, and then click Run.
In the Attribute box, type distinguishedName, in the Values box, type CN=name of the user ,OU=OUName,DC=DCName,DC=com. Under operation, click Replace, and then click Enter.
Select the Extended check box, and then click Run.
The result of restoring deleted objects using Tombstone Reanimation procedure is not perfect. You will restore a disabled account with all attributes has been stripped. You have to set the password and enable the account.
How can you determine what GPO was and was not applied for a user in a Windows AD Domain.
start->Run->cmd-> type
gpresult /?
GPRESULT /R
GPRESULT /H GPReport.html
GPRESULT /USER targetusername /V
GPRESULT /S system /USER targetusername /SCOPE COMPUTER /Z
GPRESULT /S system /U username /P password /SCOPE USER /V
gpresult /?
gpresult /R
By using the /R switch with nothing else, summary data for the various policies and settings will be printed to your command prompt.
gpresult /V
This is the same as the /R command, only the results will be verbose
GPRESULT /R
GPRESULT /H GPReport.html
GPRESULT /USER targetusername /V
GPRESULT /S system /USER targetusername /SCOPE COMPUTER /Z
GPRESULT /S system /U username /P password /SCOPE USER /V
Wednesday, 29 January 2014
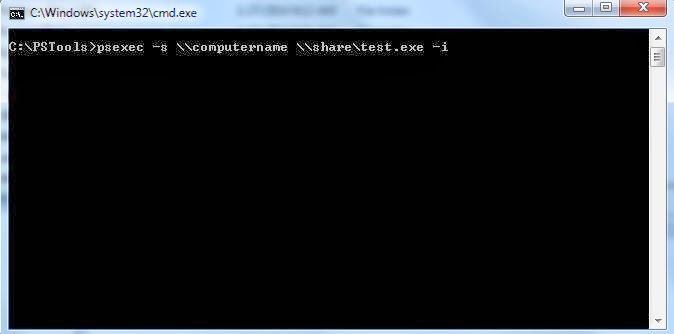
PSTools to Access remote computer on the network
PSTools to Access remote computer on the network.
Download the PSTools
Extract the file into your C drive as C:\PSTools\
From the command promt go to the C:\PSTools\
To access a remote computer on the network you can use the tool PsExec.exe

Download the PSTools
Extract the file into your C drive as C:\PSTools\
From the command promt go to the C:\PSTools\
To access a remote computer on the network you can use the tool PsExec.exe
Tuesday, 12 November 2013
NSLOOKUP(name server look up) through a given server
nslookup is command-line tool for querying the Domain Name System (DNS) to obtain domain name or IP addressmapping or for any other specific DNS record
Syntax:
C:\Users\User1>nslookup ?
Usage:
nslookup [-opt ...] # interactive mode using default server
nslookup [-opt ...] - server # interactive mode using 'server'
nslookup [-opt ...] host # just look up 'host' using default server
nslookup [-opt ...] host server # just look up 'host' using 'server'
nslookup can be used to find the query using a different server than the default dns server.
>nslookup forexample.com 8.8.8.8 - here the 8.8.8.8 is the public google dns.
Wednesday, 30 October 2013
Blocking Internet access on Terminal Server locally using using GPO’s
Open the gpedit.msc from the Start, Run
 Under User Configuration, Internet Explorer Maintenance, Connection, change the Proxy settings value and port.

 Once this is done. Change the Settings under Administrative Templates, Windows Components, Internet Explorer, Disable changing proxy settings to Enable. By doing this the user cannot change the proxy settings.

 By doing this when the user open internet explorer, it always points to the ip 0.0.0.0 which does not exist in the network and the internet page shows the page cannot be displayed.


Friday, 18 October 2013
How to add a route of a destination ip when you have multiple network cards or gateway
route -p ADD <Destination> MASK 255.255.255.255 <Gateway>
eg: route -p ADD 192.168.1.0 MASK 255.255.255.0 192.168.10.1
In this case the route looking for 192.168.1.0 network will pass through the gateway 192.168.10.1
route print - To display the entire contents of the IP routing table.
route delete 192.168.1.0 mask 255.255.255.0
Thursday, 17 October 2013
How To Empty the Clipboard memory in Windows 7
When ever you copy/ cut a word from a document its stored in the clipboard of the windows xp/7. After some times when the memory is full you cannot copy anymore. You will have to clear the items from the clipboard. To clear use the following command.


Also you can create a shotcut of the command


Thursday, 3 October 2013
Make Windows 7 Search files from the mapped or network drives
1. Click the Start button and type in Windows searches.
3. Now click on the Advanced button and select the File types tab.
4. Scroll down and locate your file type and make sure that the radio button Index Properties and File Contents is selected for the file type you are trying to find.
Once this is done the windows search will do an indexing of all the files on your computer or mapped folder.


Thursday, 26 September 2013
Add a network printer from a Print Server without user interaction in Windows xp/7
You can create a batch file and add it to run at login.
Batch file to add a network printer
RUNDLL32 PRINTUI.DLL,PrintUIEntry /in /n \\network_server\shared_printer_name
To Delete the network printer from the computer
RUNDLL32 PRINTUI.DLL,PrintUIEntry /dn /n \\network_server\shared_printer_name
Usage: rundll32 printui.dll,PrintUIEntry [options] [@commandfile]
/a[file] binary file name
/b[name] base printer name
/c[name] unc machine name if the action is on a remote machine
/dl delete local printer
/dn delete network printer connection
/dd delete printer driver
/e display printing preferences
/f[file] either inf file or output file
/F[file] location of an INF file that the INF file specified with /f may depend on
/ga add per machine printer connections (the connection will be propagated to the user upon logon)
/ge enum per machine printer connections
/gd delete per machine printer connections (the connection will be deleted upon user logon)
/h[arch] driver architecture one of the following, x86 or x64 or Itanium
/ia install printer driver using inf file
/id install printer driver using add printer driver wizard
/if install printer using inf file
/ii install printer using add printer wizard with an inf file
/il install printer using add printer wizard
/in add network printer connection
/ip install printer using network printer installation wizard
/j[provider] print provider name
/k print test page to specified printer, cannot be combined with command when installing a printer
/l[path] printer driver source path
/m[model] printer driver model name
/n[name] printer name
/o display printer queue view
/p display printer properties
/q quiet mode, do not display error messages
/r[port] port name
/s display server properties
/Ss Store printer settings into a file
/Sr Restore printer settings from a file
Store or restore printer settings option flags that must be placed at the end of command:
2 PRINTER_INFO_2
7 PRINTER_INFO_7
c Color Profile
d PrinterData
s Security descriptor
g Global DevMode
m Minimal settings
u User DevMode
r Resolve name conflicts
f Force name
p Resolve port
i Driver name conflict
/u use the existing printer driver if it's already installed
/t[#] zero based index page to start on
/v[version] driver version one of the following, "Type 2 - Kernel Mode" or "Type 3 - User Mode"
/w prompt the user for a driver if specified driver is not found in the inf
/y set printer as the default
/Xg get printer settings
/Xs set printer settings
/z do not auto share this printer
/Y do not auto generate a printer name
/K changes the meaning of /h to accept 2,3,4 for x86 or x64 or Itanium and /v to accept 3 for "Type 3 - User Mode"
/Z share this printer, can only be used with the /if option
/? help this message
@[file] command line argument file
/Mw[message] show a warning message before committing the command
/Mq[message] show a confirmation message before committing the command
/W[flags] specifies flags and switches for the wizards (for APW & APDW)
r make the wizards to be restart-able from the last page
/G[flags] specifies global flags and switches
w suppress setup driver warnings UI (super quiet mode)
Examples:
Run server properties:
rundll32 printui.dll,PrintUIEntry /s /t1 /c\\machine
Run printer properties:
rundll32 printui.dll,PrintUIEntry /p /n\\machine\printer
Run add printer wizard locally:
rundll32 printui.dll,PrintUIEntry /il
Run add printer wizard on \\machine:
rundll32 printui.dll,PrintUIEntry /il /c\\machine
Run queue view:
rundll32 printui.dll,PrintUIEntry /o /n\\machine\printer
Run inf install:
rundll32 printui.dll,PrintUIEntry /if /b "Test Printer" /f c:\infpath\infFile.inf /r "lpt1:" /m "Brother DCP-128C"
Run inf install (with inf dependency). In the example, prnbr002.inf depends on ntprint.inf
rundll32 printui.dll, PrintUIEntry /ia /m "Brother DCP-128C" /K /h x64 /v 3 /f "c:\infpath\prnbr002.inf" /F "c:\infpath\ntprint.inf"
Run add printer wizard using inf:
rundll32 printui.dll,PrintUIEntry /ii /f c:\infpath\infFile.inf
Add printer using inbox printer driver:
rundll32 printui.dll,PrintUIEntry /if /b "Test Printer" /r "lpt1:" /m "Brother DCP-128C"
Add per machine printer connection (the connection will be propagated to the user upon logon):
rundll32 printui.dll,PrintUIEntry /ga /c\\machine /n\\machine\printer /j"LanMan Print Services"
Delete per machine printer connection (the connection will be deleted upon user logon):
rundll32 printui.dll,PrintUIEntry /gd /c\\machine /n\\machine\printer
Enumerate per machine printer connections:
rundll32 printui.dll,PrintUIEntry /ge /c\\machine
Add printer driver using inf:
rundll32 printui.dll,PrintUIEntry /ia /c\\machine /m "Brother DCP-128C" /h "x86" /v "Type 3 - User Mode" /f c:\infpath\infFile.inf
Add printer driver using inf:
rundll32 printui.dll,PrintUIEntry /ia /K /c\\machine /m "Brother DCP-128C" /h "x86" /v 3
Add inbox printer driver:
rundll32 printui.dll,PrintUIEntry /ia /c\\machine /m "Brother DCP-128C" /h "Intel" /v "Type 3 - Kernel Mode"
Remove printer driver:
rundll32 printui.dll,PrintUIEntry /dd /c\\machine /m "Brother DCP-128C" /h "x86" /v "Type 3 - User Mode"
Remove printer driver:
rundll32 printui.dll,PrintUIEntry /dd /K /c\\machine /m "Brother DCP-128C" /h "x86" /v 3
Set printer as default:
rundll32 printui.dll,PrintUIEntry /y /n "printer"
Set printer comment:
rundll32 printui.dll,PrintUIEntry /Xs /n "printer" comment "My Cool Printer"
Get printer settings:
rundll32 printui.dll,PrintUIEntry /Xg /n "printer"
Get printer settings saving results in a file:
rundll32 printui.dll,PrintUIEntry /f "results.txt" /Xg /n "printer"
Set printer settings command usage:
rundll32 printui.dll,PrintUIEntry /Xs /n "printer" ?
Store all printer settings into a file:
rundll32 printui.dll,PrintUIEntry /Ss /n "printer" /a "file.dat"
Restore all printer settings from a file:
rundll32 printui.dll,PrintUIEntry /Sr /n "printer" /a "file.dat"
Store printer information on level 2 into a file :
rundll32 printui.dll,PrintUIEntry /Ss /n "printer" /a "file.dat" 2
Restore from a file printer security descriptor:
rundll32 printui.dll,PrintUIEntry /Sr /n "printer" /a "file.dat" s
Restore from a file printer global devmode and printer data:
rundll32 printui.dll,PrintUIEntry /Sr /n "printer" /a "file.dat" g d
Restore from a file minimum settings and resolve port name:
rundll32 printui.dll,PrintUIEntry /Sr /n "printer" /a "file.dat" m p
Enable Client Side Rendering for a printer:
rundll32 printui.dll,PrintUIEntry /Xs /n "printer" ClientSideRender enabled
Disable Client Side Rendering for a printer:
rundll32 printui.dll,PrintUIEntry /Xs /n "printer" ClientSideRender disabled
Tuesday, 10 September 2013
Print Server migration in windows 2008.
The printer server can be migrated from one windows 2008
server to other without missing any settings or printer name.
Open servermanager.msc from the Run.

Under Roles expand the Print and Document Services. Right Click on the Print Server then Export printers
to a file. Save it and move this file to the new server.


On the new server Import Printers from a file, follow the
steps, select the file which is exported from the old server and click export.
Once the export is done all the settings/ name of the printers are transferred over.


Thursday, 5 September 2013
Disable/ Enable USB and CD drives in windows XP/7 using registry key
Use the registry key to disable and enable USB drives and CD drives in windows XP/7
To Disable
Windows Registry Editor Version 5.00
[HKEY_LOCAL_MACHINE\SYSTEM\CurrentControlSet\Services\UsbStor]
"Start"=dword:00000004
[HKLM\System\CurrentControlSet\Services\cdrom]
"Start"=dword:00000004
To Enable
Windows Registry Editor Version 5.00
[HKEY_LOCAL_MACHINE\SYSTEM\CurrentControlSet\Services\UsbStor]
"Start"=dword:00000003
[HKLM\System\CurrentControlSet\Services\cdrom]
"Start"=dword:00000001
Change remote desktop port number on Windows Server 2008
Please backup your registry before you make any changes.
- Start Registry Editor.
- Locate and then click the following registry subkey:HKEY_LOCAL_MACHINE\System\CurrentControlSet\Control\TerminalServer\WinStations\RDP-Tcp\PortNumber
- On the Edit menu, click Modify, and then click Decimal.
- Type the new port number, and then click OK.
- Quit Registry Editor.
- Restart the computer.
Sunday, 1 September 2013
Configure a User Account to Log On Automatically on Windows 7
1. Click Start, type netplwiz, and then press Enter.
2. In the User Accounts dialog box, click the account you want to automatically log on to.If it is available, clear the Users Must Enter A User Name And Password To Use This Computer check box.
3. Click OK.
4. In the Automatically Log On dialog box, enter the user’s password twice and click OK.
2. In the User Accounts dialog box, click the account you want to automatically log on to.If it is available, clear the Users Must Enter A User Name And Password To Use This Computer check box.
3. Click OK.
4. In the Automatically Log On dialog box, enter the user’s password twice and click OK.
Monday, 1 July 2013
"Operating System Not Found" or "Missing operating system" error message when you start your Windows XP-based computer
- The basic input/output system (BIOS) does not detect the hard disk.
- The hard disk is damaged.
- Sector 0 of the physical hard disk drive has an incorrect or malformed master boot record (MBR).
Tuesday, 25 September 2012
Windows 2008 Installation
Follow the screen shot to install Windows 2008 Server Windows 2008 Installation
Select you Language, time and currency format


Type in your product key, if it's a evaluation version click "Next" then "NO"

Select the edition of Windows server to install

Accept the license terms

Select the custom installation if its a new installation, if you are upgrading the version, please select "Upgrade"

Select the disk space where you want to install windows server, the installation is going to wipe out all the data's in the hard drive

The installation will take a while and restarts itself to finish

Once the installation is complete, it will prompt you to change the password

Once you change the password you will be able to log into the server, you will get a welcome screen with initial configuration to complete.

Wednesday, 5 September 2012
Windows 2008 Active Directory/ Domain Preparation and installation
Preparing Windows 2008 to be a domain controller
After installing windows 2008 you will need to prepare the pre requisite for Domain Controller.
On the Initial Configuration Task Wizard
# Set Time Zone
# Configure Networking


After installing windows 2008 you will need to prepare the pre requisite for Domain Controller.
On the Initial Configuration Task Wizard
# Set Time Zone
# Configure Networking


Subscribe to:
Posts (Atom)