Thursday, 26 September 2013

Add a network printer from a Print Server without user interaction in Windows xp/7

You can create a batch file and add it to run at login.
Batch file to add a network printer
RUNDLL32 PRINTUI.DLL,PrintUIEntry /in /n \\network_server\shared_printer_name
To Delete the network printer from the computer
RUNDLL32 PRINTUI.DLL,PrintUIEntry /dn /n \\network_server\shared_printer_name

Usage: rundll32 printui.dll,PrintUIEntry [options] [@commandfile]
   /a[file] binary file name
   /b[name] base printer name
   /c[name] unc machine name if the action is on a remote machine
   /dl delete local printer
   /dn delete network printer connection
   /dd delete printer driver
   /e display printing preferences
   /f[file] either inf file or output file
   /F[file] location of an INF file that the INF file specified with /f may depend on
   /ga add per machine printer connections (the connection will be propagated to the user upon logon)
   /ge enum per machine printer connections
   /gd delete per machine printer connections (the connection will be deleted upon user logon)
   /h[arch] driver architecture one of the following, x86 or x64 or Itanium 
   /ia install printer driver using inf file
   /id install printer driver using add printer driver wizard
   /if install printer using inf file
   /ii install printer using add printer wizard with an inf file
   /il install printer using add printer wizard
   /in add network printer connection
   /ip install printer using network printer installation wizard
   /j[provider] print provider name
   /k print test page to specified printer, cannot be combined with command when installing a printer
   /l[path] printer driver source path
   /m[model] printer driver model name
   /n[name] printer name
   /o display printer queue view
   /p display printer properties
   /q quiet mode, do not display error messages
   /r[port] port name
   /s display server properties
   /Ss Store printer settings into a file
   /Sr Restore printer settings from a file
   Store or restore printer settings option flags that must be placed at the end of command:
2 PRINTER_INFO_2
7 PRINTER_INFO_7
c Color Profile
d PrinterData
s Security descriptor
g Global DevMode
m Minimal settings
u User DevMode
r Resolve name conflicts
f Force name
p Resolve port
i Driver name conflict
   /u use the existing printer driver if it's already installed
   /t[#] zero based index page to start on
   /v[version] driver version one of the following, "Type 2 - Kernel Mode" or "Type 3 - User Mode"
   /w prompt the user for a driver if specified driver is not found in the inf
   /y set printer as the default
   /Xg get printer settings
   /Xs set printer settings
   /z do not auto share this printer
   /Y do not auto generate a printer name
   /K changes the meaning of /h to accept 2,3,4 for x86 or x64 or Itanium and /v to accept 3 for "Type 3 - User Mode"
   /Z share this printer, can only be used with the /if option
   /? help this message
   @[file] command line argument file
   /Mw[message] show a warning message before committing the command
   /Mq[message] show a confirmation message before committing the command
   /W[flags] specifies flags and switches for the wizards (for APW & APDW)
r make the wizards to be restart-able from the last page
   /G[flags] specifies global flags and switches
w suppress setup driver warnings UI (super quiet mode)

Examples:
   Run server properties:
rundll32 printui.dll,PrintUIEntry /s /t1 /c\\machine
   Run printer properties:
rundll32 printui.dll,PrintUIEntry /p /n\\machine\printer
   Run add printer wizard locally:
rundll32 printui.dll,PrintUIEntry /il
   Run add printer wizard on \\machine:
rundll32 printui.dll,PrintUIEntry /il /c\\machine
   Run queue view:
rundll32 printui.dll,PrintUIEntry /o /n\\machine\printer
   Run inf install:
rundll32 printui.dll,PrintUIEntry /if /b "Test Printer" /f c:\infpath\infFile.inf /r "lpt1:" /m "Brother DCP-128C"
   Run inf install (with inf dependency). In the example, prnbr002.inf depends on ntprint.inf
rundll32 printui.dll, PrintUIEntry /ia /m "Brother DCP-128C" /K /h x64 /v 3 /f "c:\infpath\prnbr002.inf" /F "c:\infpath\ntprint.inf"
   Run add printer wizard using inf:
rundll32 printui.dll,PrintUIEntry /ii /f c:\infpath\infFile.inf
   Add printer using inbox printer driver:
rundll32 printui.dll,PrintUIEntry /if /b "Test Printer" /r "lpt1:" /m "Brother DCP-128C"
   Add per machine printer connection (the connection will be propagated to the user upon logon):
rundll32 printui.dll,PrintUIEntry /ga /c\\machine /n\\machine\printer /j"LanMan Print Services"
   Delete per machine printer connection (the connection will be deleted upon user logon):
rundll32 printui.dll,PrintUIEntry /gd /c\\machine /n\\machine\printer
   Enumerate per machine printer connections:
rundll32 printui.dll,PrintUIEntry /ge /c\\machine
   Add printer driver using inf:
rundll32 printui.dll,PrintUIEntry /ia /c\\machine /m "Brother DCP-128C" /h "x86" /v "Type 3 - User Mode" /f c:\infpath\infFile.inf
   Add printer driver using inf:
rundll32 printui.dll,PrintUIEntry /ia /K /c\\machine /m "Brother DCP-128C" /h "x86" /v 3
   Add inbox printer driver:
rundll32 printui.dll,PrintUIEntry /ia /c\\machine /m "Brother DCP-128C" /h "Intel" /v "Type 3 - Kernel Mode"
   Remove printer driver:
rundll32 printui.dll,PrintUIEntry /dd /c\\machine /m "Brother DCP-128C" /h "x86" /v "Type 3 - User Mode"
   Remove printer driver:
rundll32 printui.dll,PrintUIEntry /dd /K /c\\machine /m "Brother DCP-128C" /h "x86" /v 3
   Set printer as default:
rundll32 printui.dll,PrintUIEntry /y /n "printer"
   Set printer comment:
rundll32 printui.dll,PrintUIEntry /Xs /n "printer" comment "My Cool Printer"
   Get printer settings:
rundll32 printui.dll,PrintUIEntry /Xg /n "printer"
   Get printer settings saving results in a file:
rundll32 printui.dll,PrintUIEntry /f "results.txt" /Xg /n "printer"
   Set printer settings command usage:
rundll32 printui.dll,PrintUIEntry /Xs /n "printer" ?
   Store all printer settings into a file:
rundll32 printui.dll,PrintUIEntry /Ss /n "printer" /a "file.dat"
   Restore all printer settings from a file:
rundll32 printui.dll,PrintUIEntry /Sr /n "printer" /a "file.dat"
   Store printer information on level 2 into a file :
rundll32 printui.dll,PrintUIEntry /Ss /n "printer" /a "file.dat" 2
   Restore  from a file printer security descriptor:
rundll32 printui.dll,PrintUIEntry /Sr /n "printer" /a "file.dat" s
   Restore  from a file printer global devmode and printer data:
rundll32 printui.dll,PrintUIEntry /Sr /n "printer" /a "file.dat" g d
   Restore  from a file minimum settings and resolve port name:
rundll32 printui.dll,PrintUIEntry /Sr /n "printer" /a "file.dat" m p
   Enable Client Side Rendering for a printer:
rundll32 printui.dll,PrintUIEntry /Xs /n "printer" ClientSideRender enabled
   Disable Client Side Rendering for a printer:
rundll32 printui.dll,PrintUIEntry /Xs /n "printer" ClientSideRender disabled

Tuesday, 24 September 2013

How to Enable Remote desktop on Windows XP/7

To enable remote desktop, open System from the control panel or right click on My Computer, Properties. Go to Remote settings
In Windows 7


In Windows XP 


Tuesday, 17 September 2013

Enable Concurrent Desktop Sessions in Windows Workstation edition

In windows workstation editions like Windows 7, Vista or 8 you can have only one remote desktop session at a time. In some cases its better to have another persion login to your computer and use it on a different desktop. This can be done by downloading and installing  Universal Termsrv.dll Patch.
Select the x86 or x64 version of the patch and run as administrator. Once its done restart the computer.


to uninstall the rename the .backup file and delete the other file under C:\Windows\System32


Friday, 13 September 2013

Enable Developer Options In Android 4.2 On Nexus 4 And Galaxy Nexus

To Enable Developer mode Go to Settings -> About Phone -> Repeatedly tap on Builder Number until you get the message "you are now a developer". Once the developer mode is ON, go back to about phone and find the USB debugging.


Tuesday, 10 September 2013

Print Server migration in windows 2008.

The printer server can be migrated from one windows 2008 server to other without missing any settings or printer name.
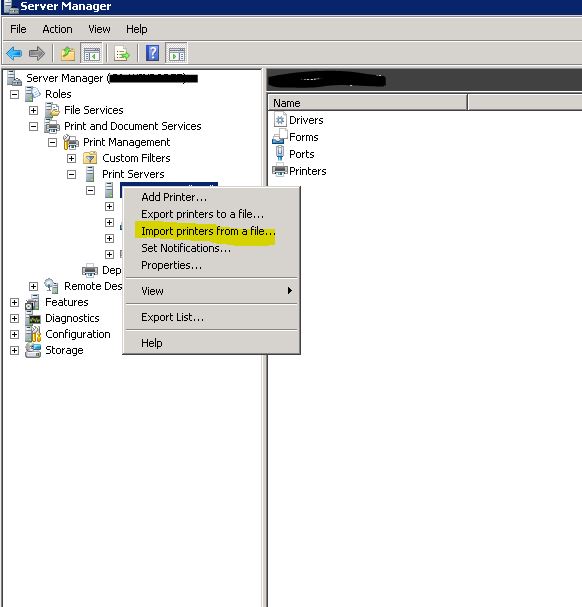
Open servermanager.msc from the Run.
Under Roles expand the Print and Document Services. Right Click on the Print Server then Export printers to a file. Save it and move this file to the new server. 
On the new server Import Printers from a file, follow the steps, select the file which is exported from the old server and click export. Once the export is done all the settings/ name of the printers are transferred over.


Monitoring an application with powershell script

This will help you to create a powershell script to check a running application. If the application is running you will receive an email and if its not running powershell script will start the application. You can copy and make the necessary changes to it and run it with power shell, also you can run it as a scheduled task. Save the script as "anyname.ps1". In this example i am trying to see Outlook is running.


$process = Get-Process -Name "outlook"
$date = Get-Date
if (!$process){
{$_.running -eq $false}
    & "C:\Program Files (x86)\Microsoft Office\OFFICE11\outlook.exe"
}
else {

$emailSmtpServer = "smtp.gmail.com"
$emailSmtpServerPort = "587"
$emailSmtpUser = "youremailidhere@gmail.com"
$emailSmtpPass = "yourgmailpasswordhere"

$emailFrom = "youremailidhere@gmail.com"
$emailTo = "youremailidhere@gmail.com"

$emailMessage = New-Object System.Net.Mail.MailMessage( $emailFrom , $emailTo )
$emailMessage.Subject = "Computer started with Axis"
$emailMessage.IsBodyHtml = $true
$emailMessage.Body = @"
<p>type a message here for you to see on your email.</p>
<p>starting Outlook $date</p>
"@

$SMTPClient = New-Object System.Net.Mail.SmtpClient( $emailSmtpServer , $emailSmtpServerPort )
$SMTPClient.EnableSsl = $true
$SMTPClient.Credentials = New-Object System.Net.NetworkCredential( $emailSmtpUser , $emailSmtpPass );
$SMTPClient.Send( $emailMessage )
}

Monday, 9 September 2013

Port forwarding in Cisco Router RV042

Login to the router from a web interface, if its the default ip(192.168.1.1) prompt for a username and password(default is admin/admin). Once logged in go to Setup, click on forwarding, there you can see the options to add a new service. The service we are adding is RDP for windows XP/7. 

 Once you click on the service, give a name "RDP" and the TCP port for the rdp in windows is 3389, provide as shown and then add to the list.
 Find the recently added RDP service then put the ip address where you want to forward the port to then add to list and enable it. Once its done save the settings. Once saved you can RDP  to 192.168.10.10 through the router RV042.


How to Copy the Autocomplete Information to a New Outlook Profile

In Outlook 2010 the best solution is to keep the same name(profile name) on the new computer. Once you keep the same name the auto complete will transfer by itself if you copy the "username.pst" file from the old computer(located c:\users\name of the user\documents\Outlook files) to the new.
But in older versions of Outlook(2003/ 2007). there is a file named "Outlook.NK2" under the user profile
In windows 7 (C:\Users\username\AppData\Roaming\Microsoft\Outlook\Outlook.NK2 or %APPDATA%\Microsoft\Outlook )
In Windows XP (C:\Documents and Settings\username\Application Data\Microsoft\Outlook\Outlook.NK2) copy this file to the new profile.

 Import the Auto-Complete List

You are now ready to start Outlook and import the file, but you must start Outlook with a special one-time command.
Do one of the following:
  • Windows 7    Click Start {picture}. Next to the Shut down button, in the Search programs and files box, type outlook /importnk2 and then press Enter.
  • Windows Vista    Click Start {picture}. Next to the Shut Down button, in the Search box, type outlook /importnk2 and then press Enter.
  • Windows XP    Click Start {picture}, click Run, type outlook /importnk2 and then press Enter.
If you want to export the .NK2 files into contact use the software from Nirsoft
http://www.nirsoft.net/utils/outlook_nk2_edit.html

Windows 7 logged into TEMP Profile

This problem occurs if the current user is deleted or in a domain network the network is down to authenticate the login. In all the cases windows 7 create a temp profile for the user and the old or correct user is rename in the registry as .bak. So the only thing you have to do is to delete the user from the registry and takeout the .bak registry entry showing the username.

Follow this step.
 1. Log on to the system by using an administrative user account other than the user account that is experiencing the problem.
2. Click Start, type regedit in the Start Search box, and then press ENTER.
If you are prompted for an administrator password or for confirmation, type your password, or click Continue.
3.Locate the following registry subkey:
HKEY_LOCAL_MACHINE\SOFTWARE\Microsoft\Windows NT\CurrentVersion\ProfileList
4.Under the ProfileList subkey, delete the subkey that is named similar to SID.bak. and take out the .bak from the SID.bak registry file
Note SID is a placeholder for the security identifier (SID) of the user account that is experiencing the problem. The SID.bak subkey should contain a ProfileImagePath registry entry that points to the original profile folder of the user account that is experiencing the problem.
6. Exit Registry Editor.
7. Log off the system.
8. Log on to the system again.
,


Sunday, 8 September 2013

Configure VoIP in your Cisco SPA122 adapter

You can use an SPA 122 adapter to setup your own voip phone. You have to get a DID number from a provider and configure it on the voip adpter. To configure it on the SPA 122 follow the step after getting the DID number.
The default ip to access voip adapter is http://192.168.15.1
Connect the computer to use DHCP and connect it to the yellow port of the voip adapter.
access http://192.168.15.1 from your internet browser or any other browser. You will be prompt to enter the username and password. Enter admin/admin as username and password.
Once you enter the username /password you will be on the quick setup. Enter the following information provided by your DID provider and submit the changes. Keep the networking in bridge mode if you are connected to a router that is providing the ip address.                                                                     


Friday, 6 September 2013

Create a Virtual machine on an existing physical machine

Virtual machines can be easily made with the virtualization host softwares like virtaul box /vmware player and its free to download.

https://www.virtualbox.org/
https://my.vmware.com/web/vmware/free#desktop_end_user_computing/vmware_player/6_0

http://www.vmware.com/products/player/

Once the virtaul box is downloaded and installed, open it. To create a new virtual machine click on New.


Once you click on Create the virtual machine will be created. Press the start to power on the machine and insert a CD with Windows XP into the physical machine to start installing.


To change / modify the virtual machine settings you can always use "Settings" tab.

Thursday, 5 September 2013

PowerShell script to kill a not responding task in windows

$notres = Get-Process | Where-Object { $_.responding -eq $false}
$notres.kill()

PowerShell script to use ping

$program = "C:\windows\system32\ping.exe"
$programArgs = "192.168.1.1", "-n", 4
Invoke-Command -ScriptBlock { & $program $programArgs }

What you can do if the websites are blocked by your internet service provider

Some internet service providers block websites which are useful some times. The best option is to use external proxy server. Some website like hidemyass can help you open that website even if the internet service provider blocks the website.
To change the Proxy Settings on your browser,
Web browser instructions
Mozilla Firefox: Tools > Options > Advanced > Settings > Manual proxy configuration.
Google Chrome: Options > Under the hood > Network > Change proxy settings > LAN settings > Use a proxy server > Advanced > HTTP.
Internet Explorer: Tools > Internet options > Connections > LAN settings > Use a proxy server > Advanced > HTTP.
Opera: Tools > Preferences > Advanced > Network.
Use one of the external proxy provided under the website hidemyass. Once you change to the external proxy the website blocked by your internet provider will work.

Disable/ Enable USB and CD drives in windows XP/7 using registry key

Use the registry key to disable and enable USB drives and CD drives in windows XP/7
To Disable
Windows Registry Editor Version 5.00
[HKEY_LOCAL_MACHINE\SYSTEM\CurrentControlSet\Services\UsbStor]
"Start"=dword:00000004
[HKLM\System\CurrentControlSet\Services\cdrom]
"Start"=dword:00000004
To Enable

Windows Registry Editor Version 5.00
[HKEY_LOCAL_MACHINE\SYSTEM\CurrentControlSet\Services\UsbStor]
"Start"=dword:00000003
[HKLM\System\CurrentControlSet\Services\cdrom]
"Start"=dword:00000001

Change remote desktop port number on Windows Server 2008


Please backup your registry before you make any changes. 

  1. Start Registry Editor.
  2. Locate and then click the following registry subkey:
    HKEY_LOCAL_MACHINE\System\CurrentControlSet\Control\TerminalServer\WinStations\RDP-Tcp\PortNumber
  3. On the Edit menu, click Modify, and then click Decimal.
  4. Type the new port number, and then click OK.
  5. Quit Registry Editor.
  6. Restart the computer.

Wednesday, 4 September 2013

Kill a not responding application from PowerShell

Type the command in a notepad and save it as "name.ps1" and run it with powershell

$notres = Get-Process | Where-Object { $_.responding -eq $false}
$notres.kill()

RPC over HTTP outlook 2003 to save password

http://support.microsoft.com/default.aspx?scid=kb;en-us;820281
Basic authentication
If you want to use Basic authentication, you must continue to type your user account credentials. There is no way for the client to submit your user name and password automatically. If you want to log on automatically, you must configure your Outlook profile to use NLTM authentication to your proxy server for Exchange.
Before you switch to using NTLM authentication, you must verify with your administrator that NTLM authentication is permitted or even possible in your environment. Many firewalls and proxy servers will prevent successful NLTM authentication, whereas Basic authentication will work successfully. See the More Information section for additional details.
Note The authentication mechanism that you configure in Outlook is used only for the HTTP session to your proxy server for Exchange. The actual authentication between Outlook and your Exchange server always uses NTLM. See the More Information section for additional details.
To change the authentication mechanism on the Outlook client to NTLM, follow these steps:
Start Outlook 2003.
On the Tools menu, click E-mail Accounts.
Click View or change existing e-mail accounts, and then click Next.
Under Outlook processes e-mail for these accounts in the following order, click Microsoft Exchange Server, and then click Change.
On the Exchange Server Settings page, click More Settings.
Click the Connection tab.
Click Exchange Proxy Settings.
Under Proxy authentication settings, click NTLM Authentication in the Use this authentication when connecting to my proxy server for Exchange list.
Click OK two times.
Click OK again in response to the prompt that you must restart Outlook for the changes to take effect.
Click Next, and then click Finish.
Restart Outlook.
NTLM authentication
If your account is configured to use NTLM authentication and you are still prompted for your user name and password when you are logged on as the Windows account that has access to your Exchange mailbox, you must set the LmCompatibilityLevel on your client to a value of 2 or 3. To do this, follow these steps.

Click Start, click Run, type regedit in the Open box, and then press ENTER.
Locate and then click the following registry subkey:
HKEY_LOCAL_MACHINE\SYSTEM\CurrentControlSet\Control\Lsa\
In the right pane, double-click lmcompatibilitylevel.
In the Value data box, type a value of 2 or 3 that is appropriate for your environment, and then click OK.
Quit Registry Editor.
Restart your computer.

Sunday, 1 September 2013

Configure a User Account to Log On Automatically on Windows 7

Link: http://technet.microsoft.com/en-us/magazine/ee872306.aspx
1. Click Start, type netplwiz, and then press Enter.
2. In the User Accounts dialog box, click the account you want to automatically log on to.If it is available, clear the Users Must Enter A User Name And Password To Use This Computer check box.
3. Click OK.
4. In the Automatically Log On dialog box, enter the user’s password twice and click OK.