Tuesday 25 September 2012

Windows 2008 Installation

Follow the screen shot to install Windows 2008 Server Windows 2008 Installation

Select you Language, time and currency format


Type in your product key, if it's a evaluation version click "Next" then "NO"


Select the edition of Windows server to install

Accept the license terms


Select the custom installation if its a new installation, if you are upgrading the version, please select "Upgrade"


Select the disk space where you want to install windows server, the installation is going to wipe out all the data's in the hard drive


The installation will take a while and restarts itself to finish


Once the installation is complete, it will prompt you to change the password


Once you change the password you will be able to log into the server, you will get a welcome screen with initial configuration to complete.


Saturday 15 September 2012

How to copy files to ESXi server through SSH

Copying ISO images or files to ESXi is much easier through SSH. It can be done by enabling SSH and then transferring files through WinSCP.
To enable SSH on ESXi 5.1 follow the screen shot


Once the SSH is enabled download the WinSCP and the connect to the server, then you can access the ESXi server datastore through WinSCP.

The data store path is /vmfs/volumes/DATASTORE

Wednesday 5 September 2012

Send Ctrl-Alt-Delete in a remote desktop session

Ctrl + Alt + Del will only work for the local computer.
In order to send Ctrl + Alt + Del to the remote PC, just press the following alternate key combination:
Ctrl + Alt + End
Alt + Page Up – Switch between programs (Alt + Tab is the local command)
Ctrl + Alt + End – Display the Task Manager (Ctrl + Shift + Esc is the local command)
Alt + Home – Brings up the Start menu on the remote computer
Ctrl + Alt + (+) Plus/ (-) Minus – Minus takes a snapshot of the active window and plus takes a snapshot of the entire remote desktop 

Router RIP

IP Routing

RPC over HTTP settings on Outlook 2007

Go to Control Panel. Open the “Mail” in control panel.


Click on “E-mail Accounts…”


Click on “New..”


Select “Microsoft Exchange”


On Microsoft Exchange Server enter "your mail server name"
And on User Name enter “your username”., then click the “More Settings…”


Go to the “connection” tab on more settings. Check the “Connect to Microsoft exchange using HTTP” under “Outlook Anywhere”. Then click the “Exchange Proxy Settings..”


Enter “mail.domain.com” in the box https:// and change the “Proxy Authentication settings” to Basic Authentication. Click OK, Apply, and OK


Click OK, Next, Close and Open Outlook 2007 to synchronize with exchange

Load the Analysis Toolpak in Office 2003 Excel

Link: http://office.microsoft.com/en-us/excel/HP011277241033.aspx
The Analysis Toolpak is an Excel add-in program that is available when you install Microsoft Office or Excel. To use it in Excel, however, you need to load it first.
On the Tools menu, click Add-Ins.
In the Add-Ins available box, select the check box next to Analysis Toolpak, and then click OK.
Tip If Analysis Toolpak is not listed, click Browse to locate it.
If you see a message that tells you the Analysis Toolpak is not currently installed on your computer, click Yes to install it.
Click Tools on the menu bar. When you load the Analysis Toolpak, the Data Analysis command is added to the Tools menu.
Note To include Visual Basis for Application (VBA) functions for the Analysis Toolpak, you can load the Analysis Toolpak - VBA Add-in the same way you load the Analysis Toolpak. In the Add-ins available box, select the check box next to Analysis Toolpak - VBA.

Vyatta Virtual Router on ESXi 4.0

To install Vyatta Virtual router on ESXi 4.0
Downloading ISO image from Vyatta’s website
http://www.vyatta.com/downloads/index.php
Create a new Virtual Machine in ESXi
Attach the ISO downloaded to the new Vyatta Virtual Machine so it can boot from the ISO.
Configure the Vyatta Virtual Machine
Installing Vyatta
You can boot from the ISO you downloaded. because it’s also a “Live CD”
You’ll first need to login to Vyatta once it’s booted up. The default logins are (user: root pass: Vyatta) To install to the drive you will issue the command:
install-system
Configuring Ethernet Interfaces
Log on the system.
Configure the first NIC (eth0) which is going to be used for Internet access.
vyatta@vyatta> configure 
[edit] 
vyatta@vyatta# set interfaces ethernet eth0 address 192.168.2.3/24 
[edit] 
vyatta@vyatta# commit 
[edit] 
vyatta@vyatta# exit 
exit 
vyatta@vyatta>
Configure eth1 now
vyatta@vyatta> configure 
[edit] 
vyatta@vyatta# set interfaces ethernet eth1 address 192.168.3.3/24 
[edit] 
vyatta@vyatta# commit 
[edit] 
vyatta@vyatta# exit 
exit 
vyatta@vyatta>
Check interfaces configuration:
vyatta@vyatta:~$ configure 
[edit] 
vyatta@vyatta# show interfaces ethernet 
eth0 { 
address 192.168.2.3/24 
description Internet 
hw-id 00:15:5d:00:01:22 

eth1 { 
address 192.168.3.3/24 
description "subnet1:MOM 2005" 
hw-id 00:15:5d:00:01:23 
Save Configuration 
vyatta@vyatta# save 
Saving configuration to 
'/opt/vyatta/etc/config/config.boot'... 
Done 
[edit]
How to enable the Vyatta web-based GUI
vyatta@vyatta$
vyatta@vyatta# set service https
[edit]
vyatta@vyatta# commit
[edit]
OK
vyatta@vyatta#

Installing eyeOS on Ubuntu

Introduction
eyeOS is free Cloud Computing Operating System software which let you access all your necessary files, folders, office, calendar, contacts and much more anywhere in the world. eyeOS is released under the AGPLv3 license and only needs Apache 2 server, PHP5 and MySQL database server to run. With eyeOS you can build your own private Cloud Desktop today.
ApacheMySQLPHP
The Ubuntu base system includes Tasksel.
sudo apt-get install tasksel
You can either install LAMP using tasksel or install the LAMP packages as detailed above.
sudo tasksel install lamp-server
Installing Apache 2
To only install the apache2 webserver, use any method to install
apache2
Checking Apache 2 installation
With your web browser, go to the URI http://localhost : if you read "It works!", which is the content of the file /var/www/index.html , this proves Apache works.
Installing & Configuring Pre-requisites
Step 1: Install MySQL Database Server Package
To install MySQL database server, issue the following command:
$ sudo apt-get install mysql-server libmysql-java
Finally, issue the ldconfig command
$ sudo ldconfig
You can now login to your MySQL server, to test if it’s working from the terminal window, issue the command: "mysql -u root -p ", and the password when prompted.
Now let’s login and create "eyeos" database
mysql -u root -p

> CREATE DATABASE eyeos DEFAULT CHARACTER SET utf8 COLLATE utf8_unicode_ci;
> FLUSH PRIVILEGES;
> QUIT
Configure the mod-rewrite on Apache
Execute
a2enmod rewrite
Edit
nano /etc/apache2/sites-available/default
Change, at:
the variable AllowOverride to All
strong>/etc/init.d/apache2 restart
Increase the PHP memory limit
#vi /etc/php5/apache2/php.ini
memory_limit = 128M
display_errors = Off
post_max_size = 200M
upload_max_filesize = 100M
Install Other Pre-requisite Packages
There are couples of packages/software that are required for eyeOS to run smoothly; these are listed in the table below with link where to obtain them.
Python stomp.py (Needed in collaborative features)
Curl (Needed to transfer files with URL syntax)
recoll (Needed for document indexation)
exiftool (Needed to extract MP3 metadata)
OpenOffice Daemon (Needed to convert office documents)
Kaazing gateway: (Needed for real time notifications)
ActiveMQ Daemon (Needed for real time notifications)
Install Stomp.py Package
If stomp.py is needed, then you can grab the latest version from http://code.google.com/p/stomppy/ and install as follows:
1.
For Ubuntu download "_all.deb" version and then run the following command
dpkg -i stomp.py_3.0.2_all.deb
Install Curl Package
If Curl is not installed, then you can run the following command:
apt-get install php5-curl
Install Recoll
To download the package, issue this command:
sudo apt-get install recoll
Install ExifTool
To download the package, issue this command:
apt-get install libimage-exiftool-perl
Download & Install OpenOffice Daemon
Download and install Open Office if its not already installed:
apt-get install openoffice.org
From a terminal window, run Open Office in headless Modus with this command (in one line):
'sudo 'soffice "-accept=socket,host=localhost,port=2002;urp;" -headless'
Check if its running by typing: netstat -anp tcp
scroll down and you should find a line:
TCP 127.0.0.1:2002 0.0.0.0:0 LISTENING
Install Kaazing Gateway
http://www.kaazing.com/
Download and extract "kaazing-gateway-8.12_2-bin.tar.gz".
Change to the extracted directory and locate and run the server as follows:
cd /path/to/kaazing-gateway-8.12_2/bin
./gateway.start
Or
./path/to/kaazing-gateway-8.12_2/bin/gateway.start
Install Apache ActiveMQ Daemon
Download and extract ActiveMQ Daemon from here: "apache-activemq-5.3.2-bin.tar.gz".
Change to the extracted directory and locate and run the server as follows:
cd /path/to/apache-activemq-5.3.2/bin
./activemq-admin start

Or
./path/to/apache-activemq-5.3.2/bin/bin/activemq-admin start
Download and Installation eyeOS
Uncompress the downloaded package to your web directory you should see a folder named "eyeos-2.2.0.0" with 4 to 6 files and folders (depending on eyeOS version) by performing the following procedure:
mkdir eyeOS
tar –zxvf eyeos-2.2.0.0.tar.gz –C eyeOS/
sudo mv eyeOS/ /var/www/
After we do that If we are on a Linux/Unix machine we need to chmod 777 our eyeOS folder
chmod –R 777 /var/www/eyeOS/
Install eyeOS
Open your browser
On local Computer from home setup: http://localhost/eyeOS/install
On your hosting site or server: http://your-domain/eyeOS/install,
Ensure that all the required packages and pre-requisite are met. Scroll down and click the forward arrow icon.
The errors you may get
curl extension
if you get the error follow this
sudo apt-get install curl libcurl3 libcurl3-dev php5-curl
GD Extension
sudo apt-get install php5-gd
Restart Apache
# /etc/init.d/apache2 restart
Mcrypt Extension
sudo apt-get install php5-mcrypt phpmyadmin
SQLite Extension
sudo apt-get install sqlite php5-sqlite

Open the browser http://localhost/eyeOS/install and finish the installation

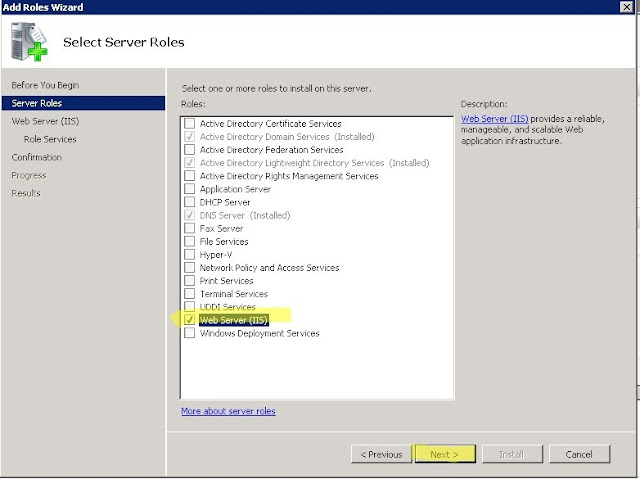
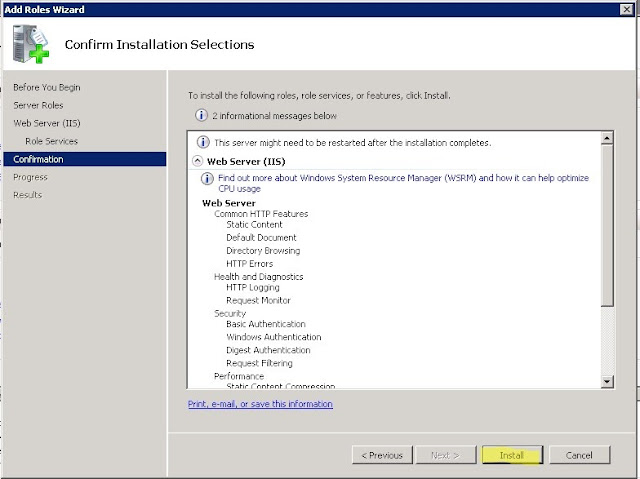
Windows 2008 Active Directory/ Domain Preparation and installation

Preparing Windows 2008 to be a domain controller
After installing windows 2008 you will need to prepare the pre requisite for Domain Controller.
On the Initial Configuration Task Wizard 
Set Time Zone
Configure Networking


Enable and Disable Ubuntu Root Password

If you want to enable root account enter the following command.
$sudo passwd root
This will prompt for a new root password and once you confirm it, you can start using the root account to login.
If you want to disable root account in ubuntu you need to lock the root account by using the following command
$sudo passwd -l root
If you want to work on a root console you’d better use the following command
$sudo -i

Install a Printer in Ubuntu and share it for windows users


Install samba first.
In Ububtu, go to System -> Administration -> Printing.


Install the printer locally.(click New and connect to the locally connected printer).
After the printer installation, install the printer again from New. This time select Network Printer, Windows Printer via SAMBA. Enter the ipaddress of the ubuntu print server ipaddress:631/printer/printername.


In windows go to Control Panel, Printers. Add a network printer, connect a printer on the internet. Under the URL box enterhttp://ipaddress:631/printers/printername.


Tuesday 4 September 2012

Error code No. 1962 " No operating system found "

This issue may occur if one or more of the following conditions are true:
· The basic input/output system (BIOS) does not detect the hard disk.
· The hard disk is damaged.
· Sector 0 of the physical hard disk drive has an incorrect or malformed master boot record (MBR).

Exchange 2010 Preparation, Installation and Configuration


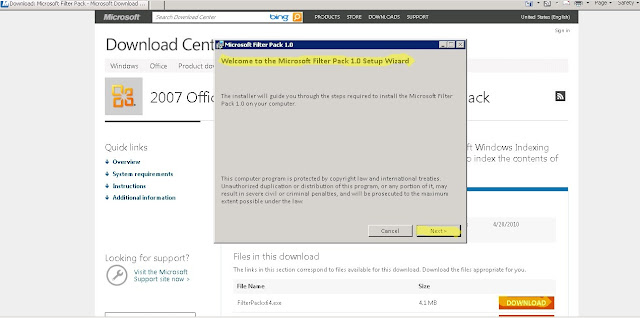
Press OK to save changes You will need to download 2007 Office System Converter pack from Microsoft Website